Ranges / Multiplets / Peaks
For the analysis of NMR peaks, NMRium uses three levels. The top level is a range which corresponds to an integration zone and may contain one or more multiplets (signals). Each multiplet includes coupling constants and multiplicity information and is further associated with peaks.
Auto ranges picking
NMRium can automatically detect integration zones (ranges) and determine their multiplicities.
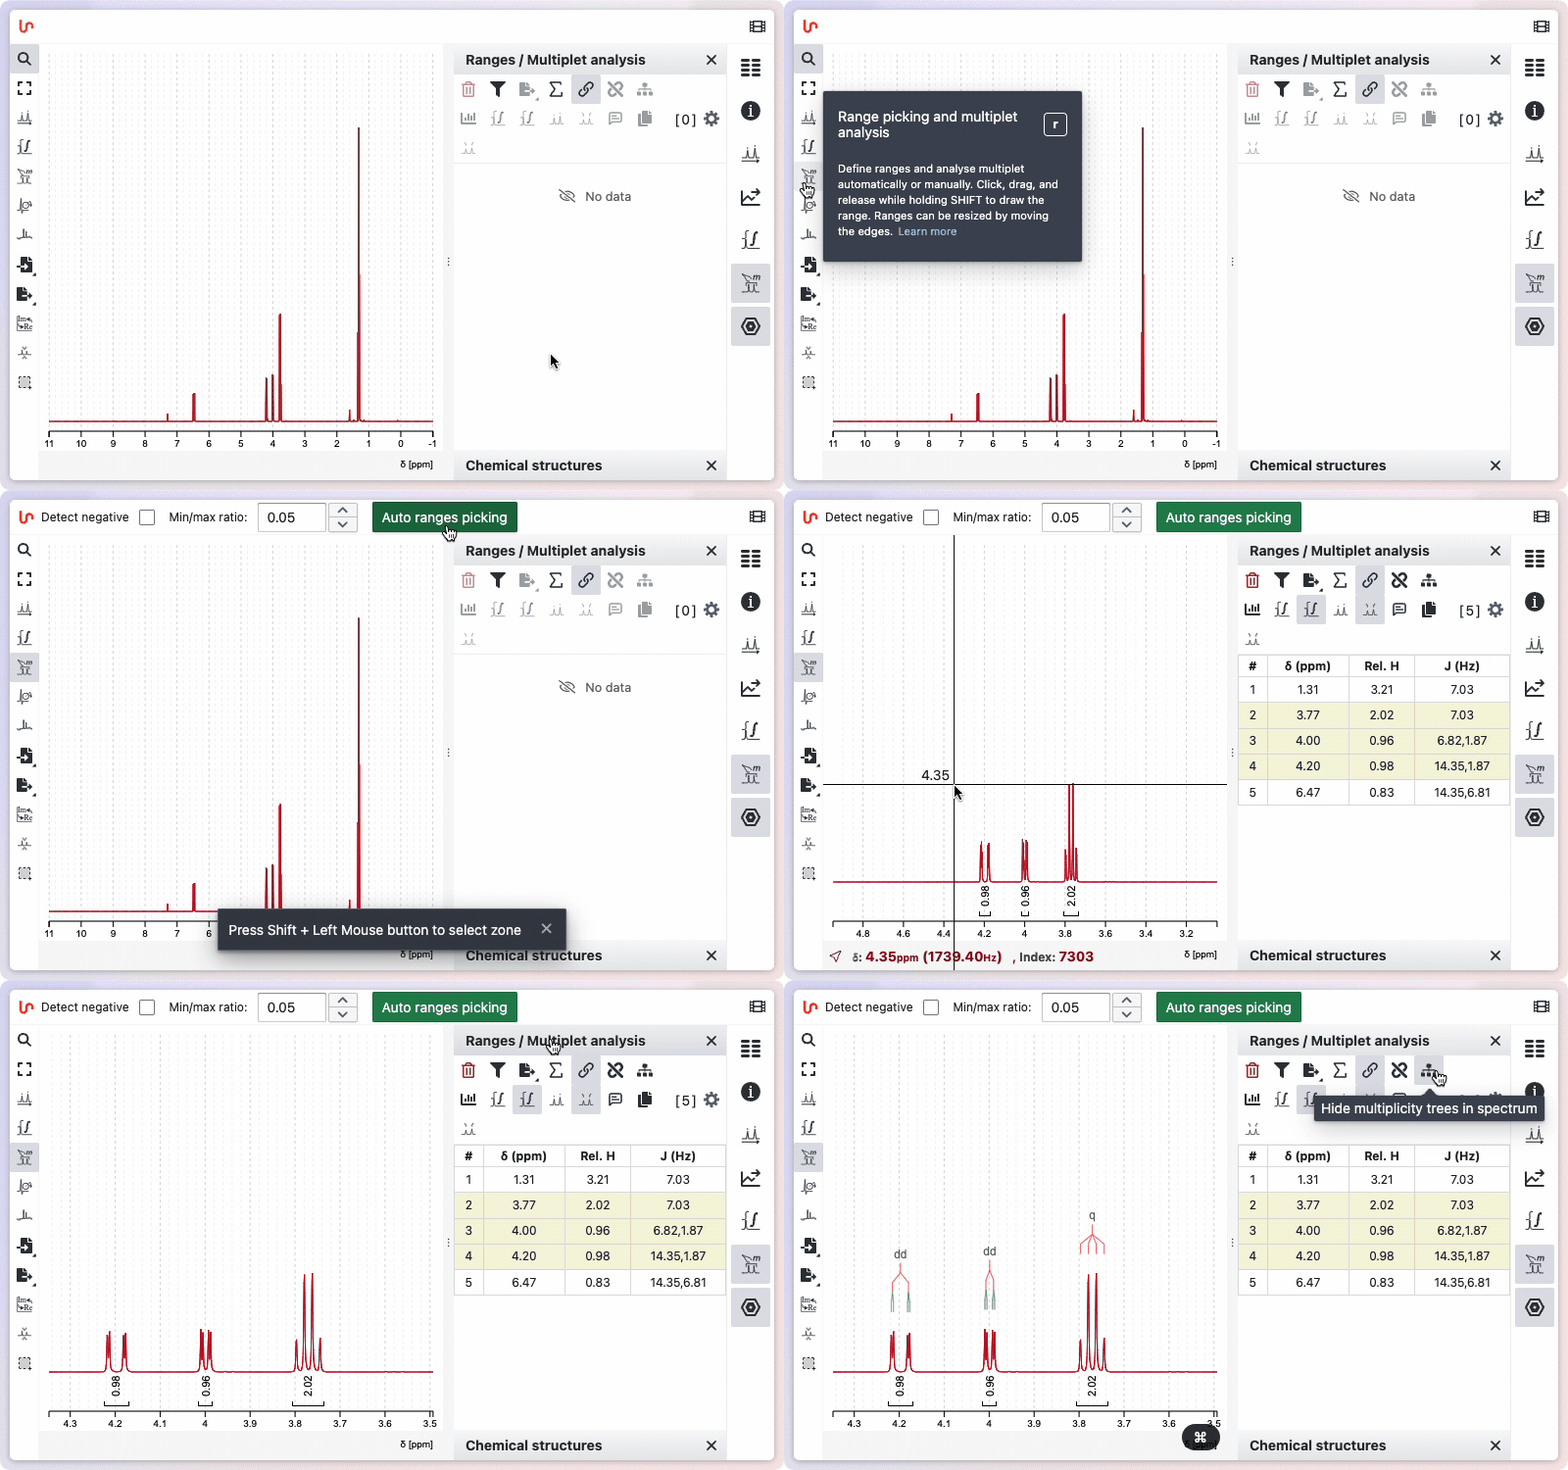
- Open the Ranges Picking tool.
- If your spectrum contains negative signals, select the Detect negative checkbox.
- (Optional) Adjust the Min/Max ratio value to fine-tune the sensitivity of the detection.
- Click the Auto ranges picking button.
The detected ranges will appear in the Ranges panel on the right side of the workspace.
Manual range picking
In some cases, you may prefer to perform manual Range Picking. After selecting the appropriate tool, draw a zone manually while holding down the Shift key. The system will then apply an internal algorithm that initially considers every multiplet as a doublet of doublets of doublets, and subsequently merges doublets if their coupling constants are sufficiently similar.
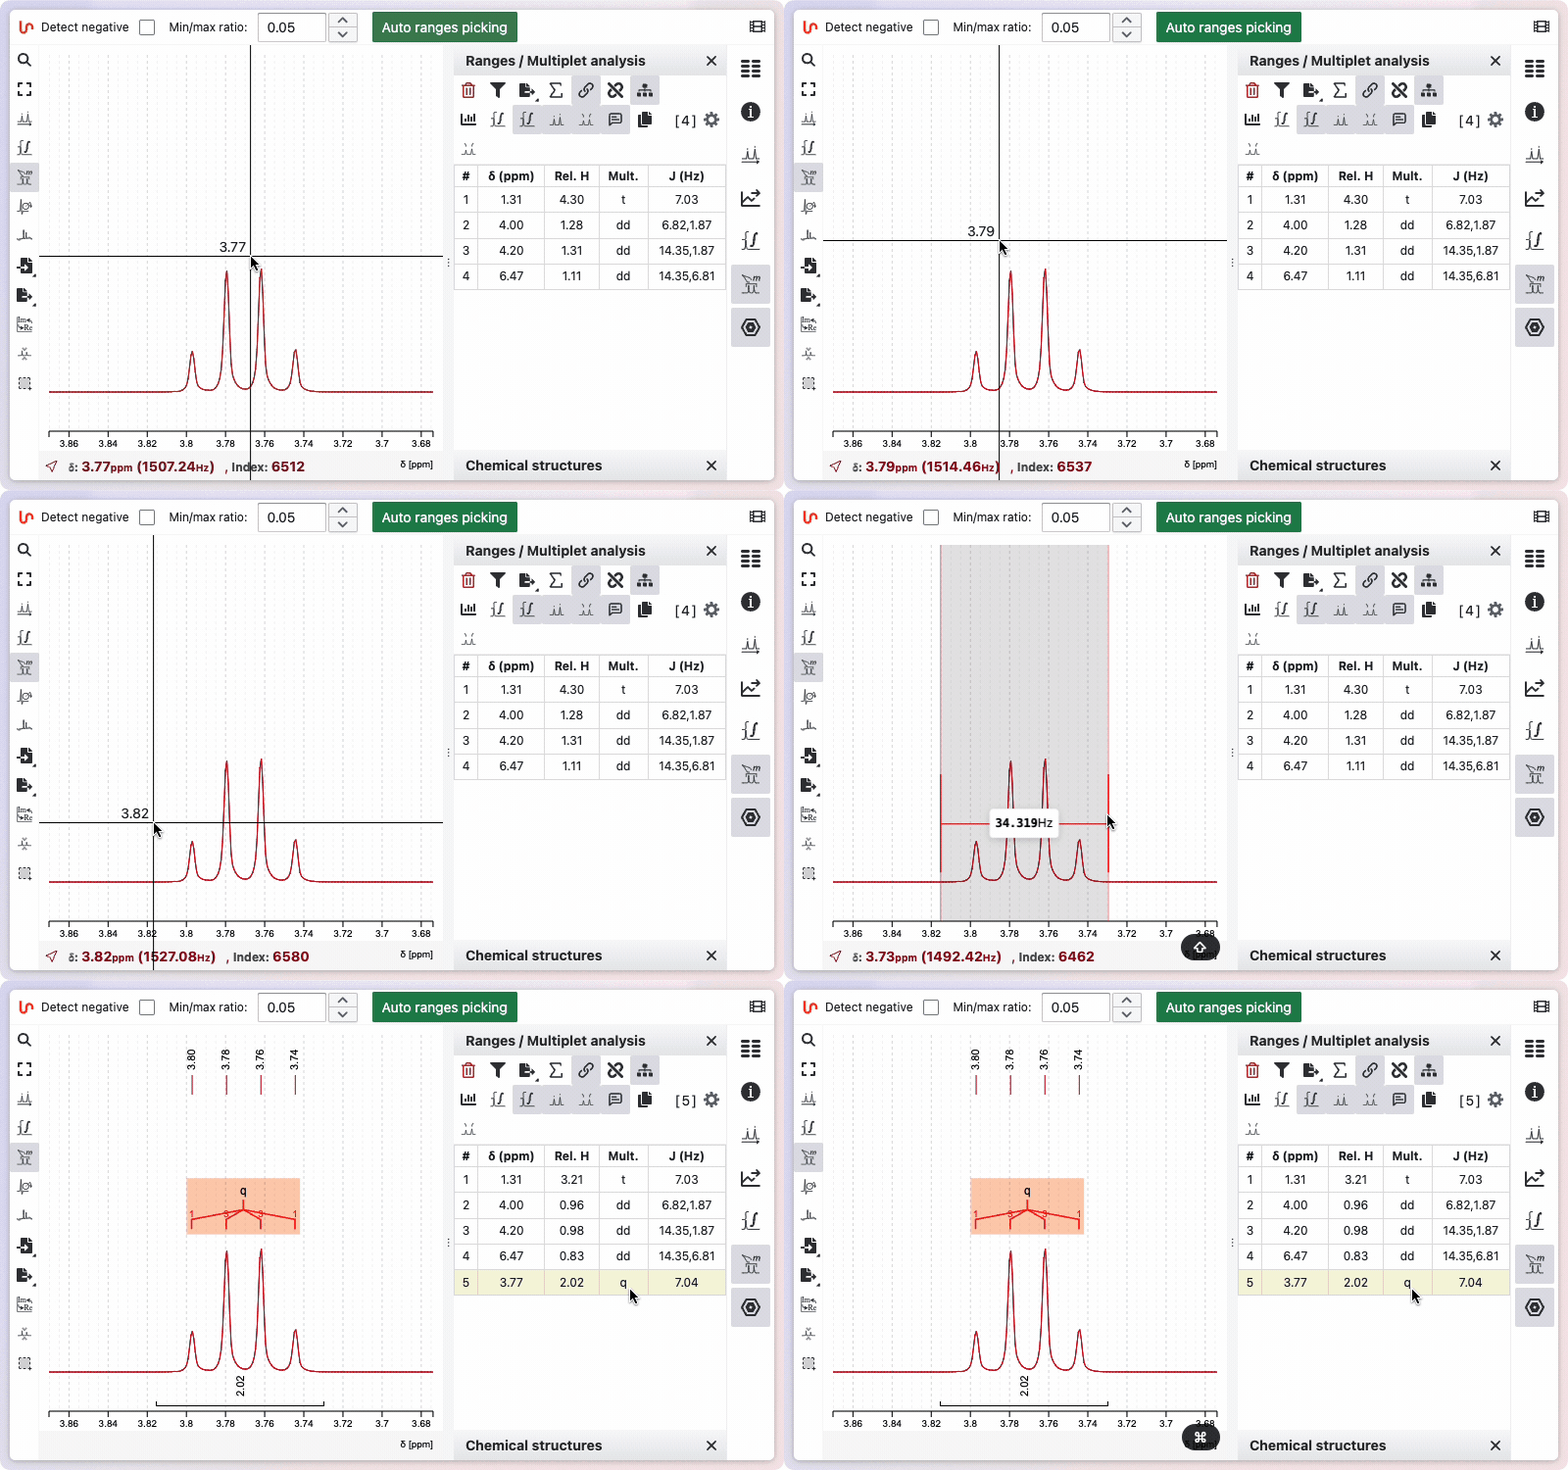
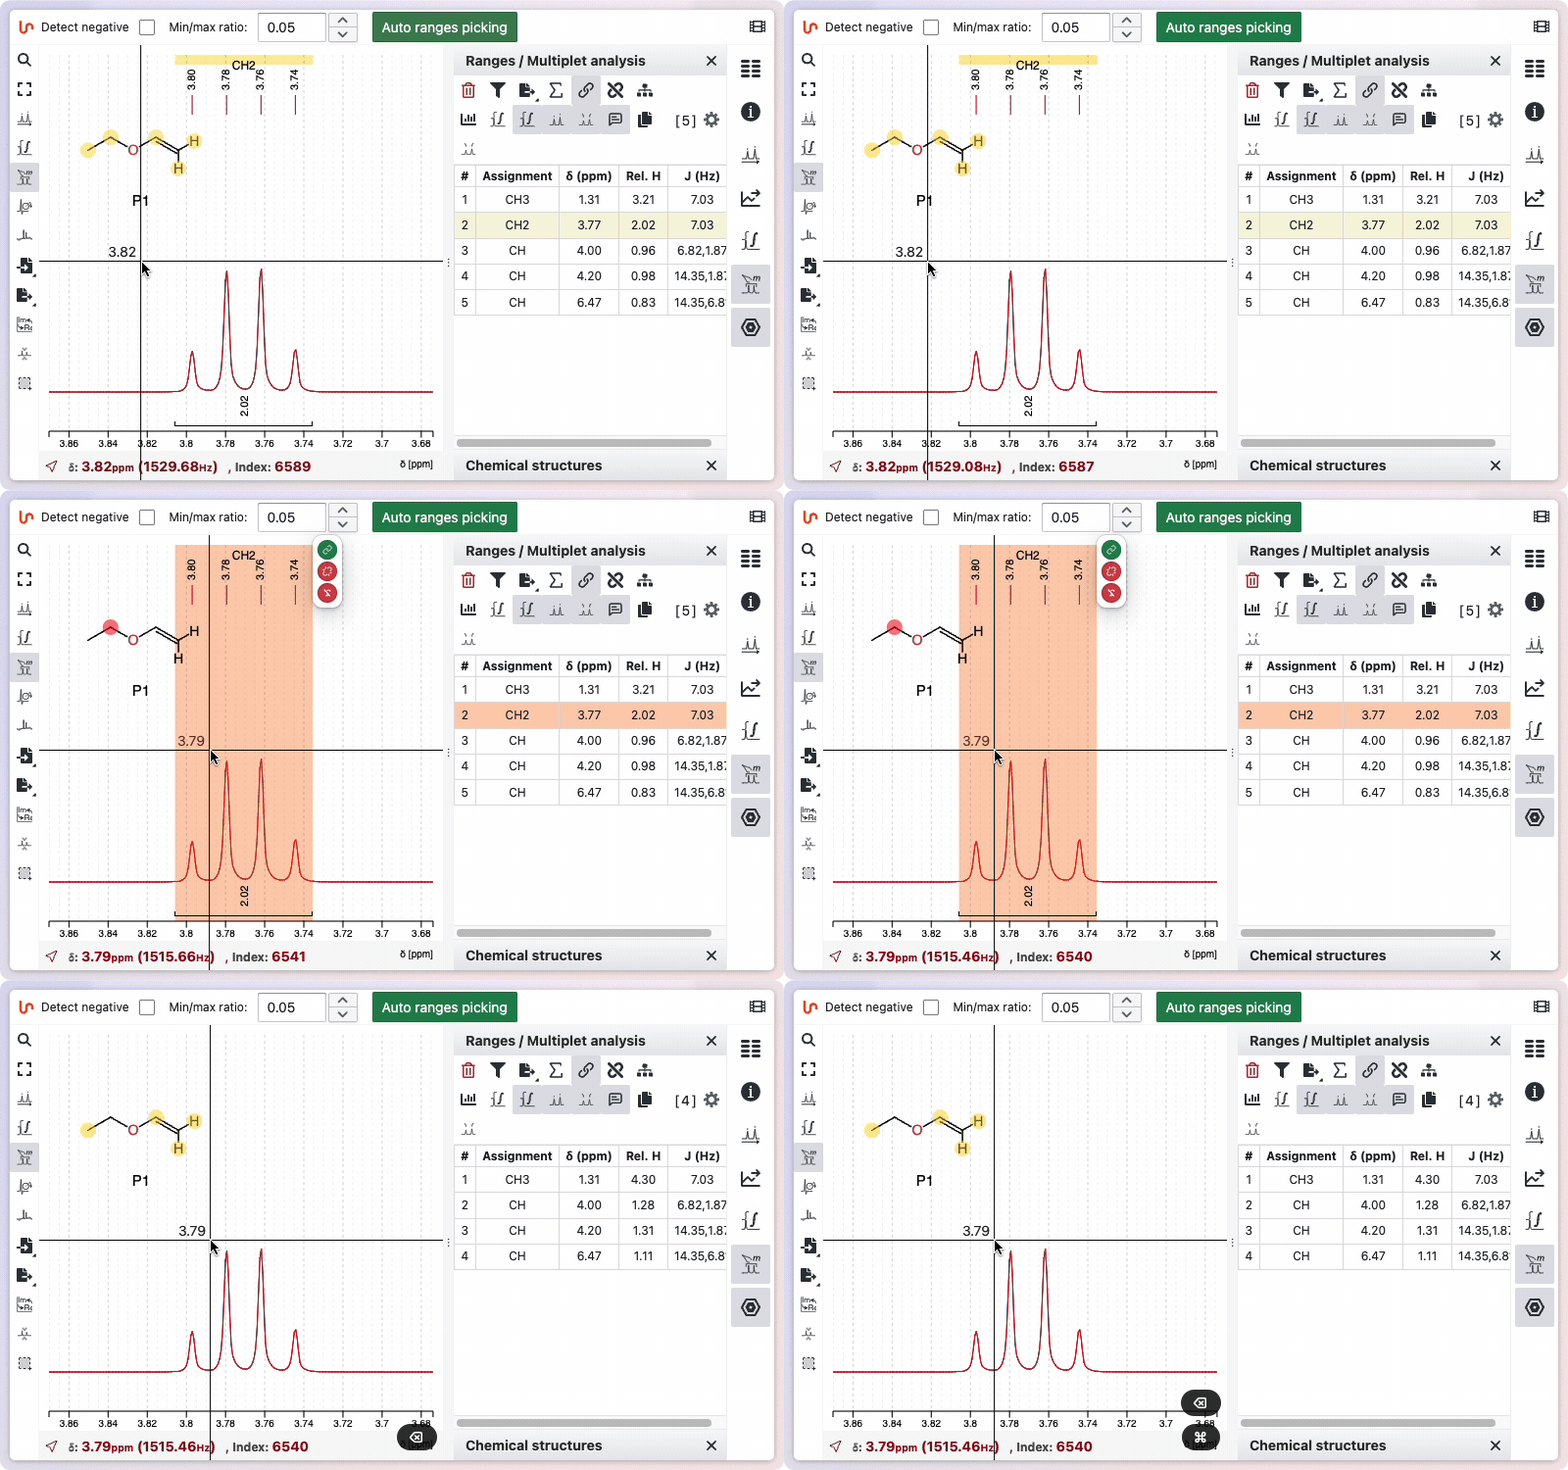
To delete a range, the fastest way is to hover over it and press the Backspace key. Alternatively, you can click the trash icon on the corresponding line in the range panel.
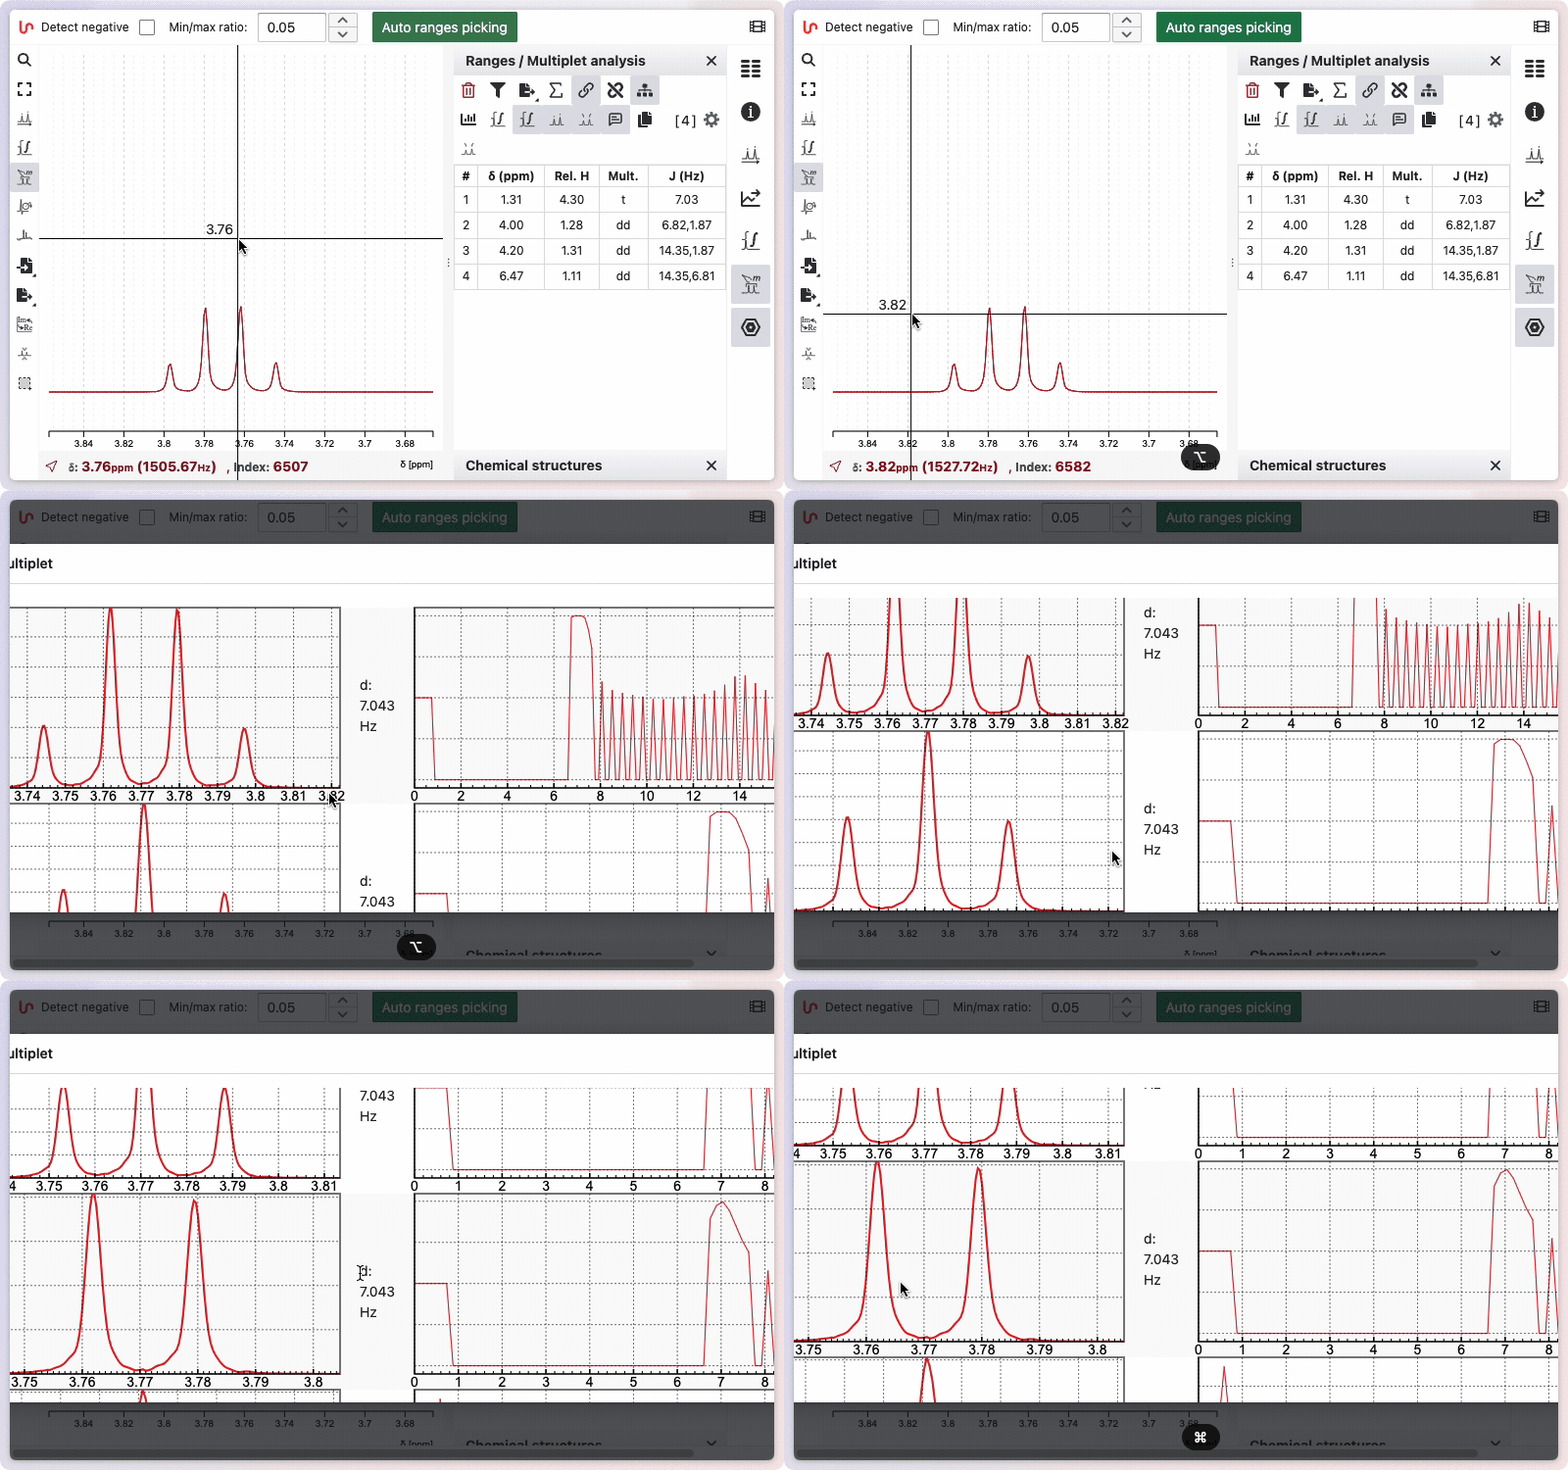
If you would like to see how the multiplicity was determined, hold the Alt key while drawing the zone. A new window will appear, displaying the different steps involved in removing doublets to determine the final multiplicity.
Edit multiplets manually
While we continuously improve the multiplicity analysis, there are always some situations in which the multiplicity cannot be accurately determined. In those cases you can edit the multiplicity manually. Editing manually is a little more challenging, but it lets you handle every case.
Add signals to a range
A range is an integration zone and may contain several signals (multiplets). In crowded regions the automatic analysis often reports a single signal for a zone that actually holds two or three overlapping multiplets, and the resulting multiplicity is then meaningless.
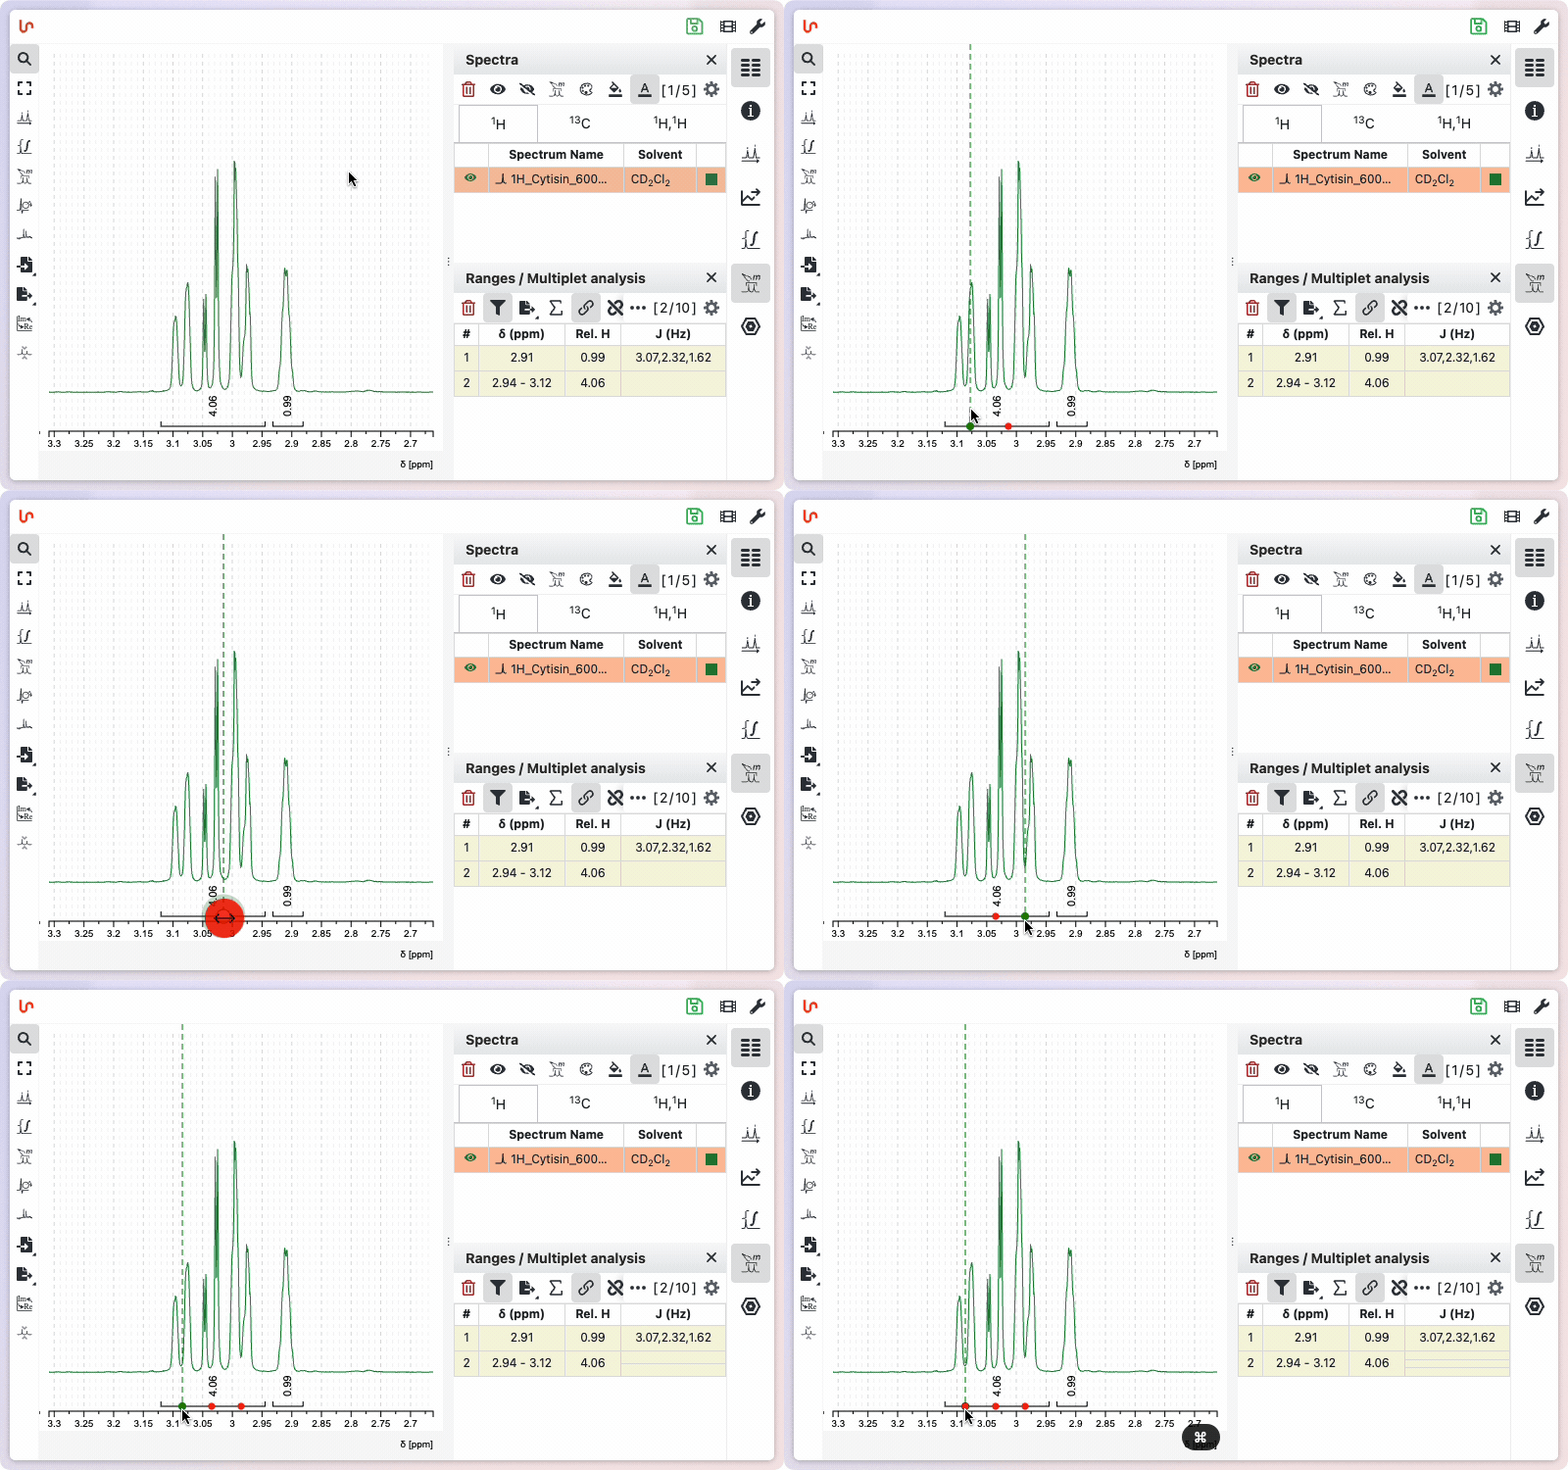
You can add the missing signals yourself. With the Ranges Picking tool active, move the pointer over the range bar drawn under the spectrum: a vertical line follows the pointer and shows where the new signal would land. Click at the chemical shift of a multiplet to add a signal there, and repeat for every multiplet you can identify. Each signal appears as a marker on the range bar and gets its own row in the Ranges / Multiplet analysis panel, with its own chemical shift, multiplicity and coupling constants.
The range keeps its integral: adding signals does not change the integration zone or the number of protons it carries, it only describes how that integral is distributed between the multiplets it contains.
A signal that is not exactly at the right place can be moved: drag its marker along the range bar and drop it at the correct chemical shift. To remove a signal, hover over its marker and press the Backspace key; the range itself and its integral are kept, only the signal disappears.
From a 2D spectrum
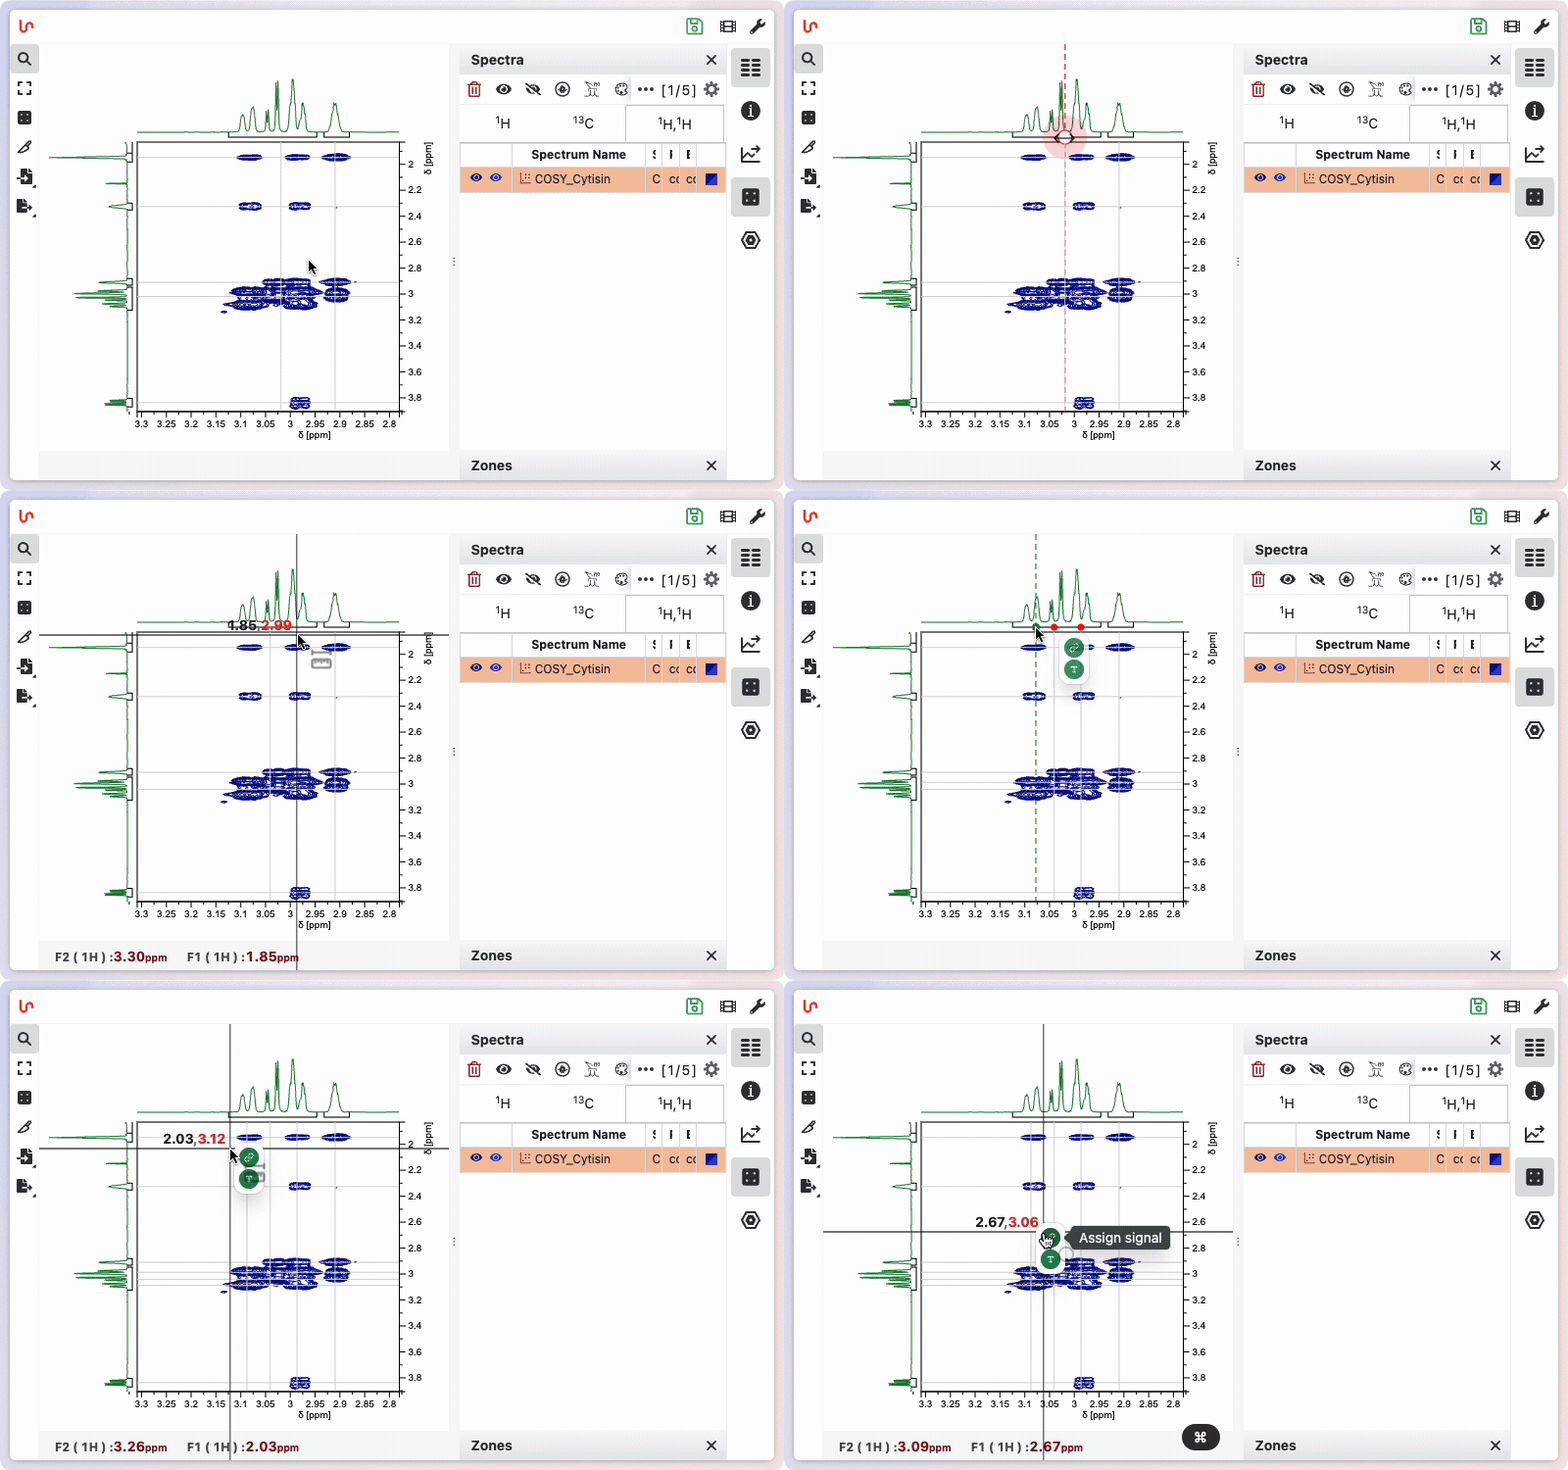
The number of signals hidden in a crowded multiplet is usually much easier to see on a 2D experiment than on the 1D trace. With a COSY, HSQC or HMBC displayed, the 1D spectrum is shown along the axis of the 2D map, so you can read the exact position of each cross peak and add the corresponding signal to the range without leaving the 2D view.
Move the pointer over a cross peak: the chemical shifts of both dimensions are displayed, and the position is projected onto the 1D trace at the top. Click on the range bar at that position to add the signal. This is the fastest way to resolve a region where the 1D alone does not tell you how many protons are present.
Set the reference
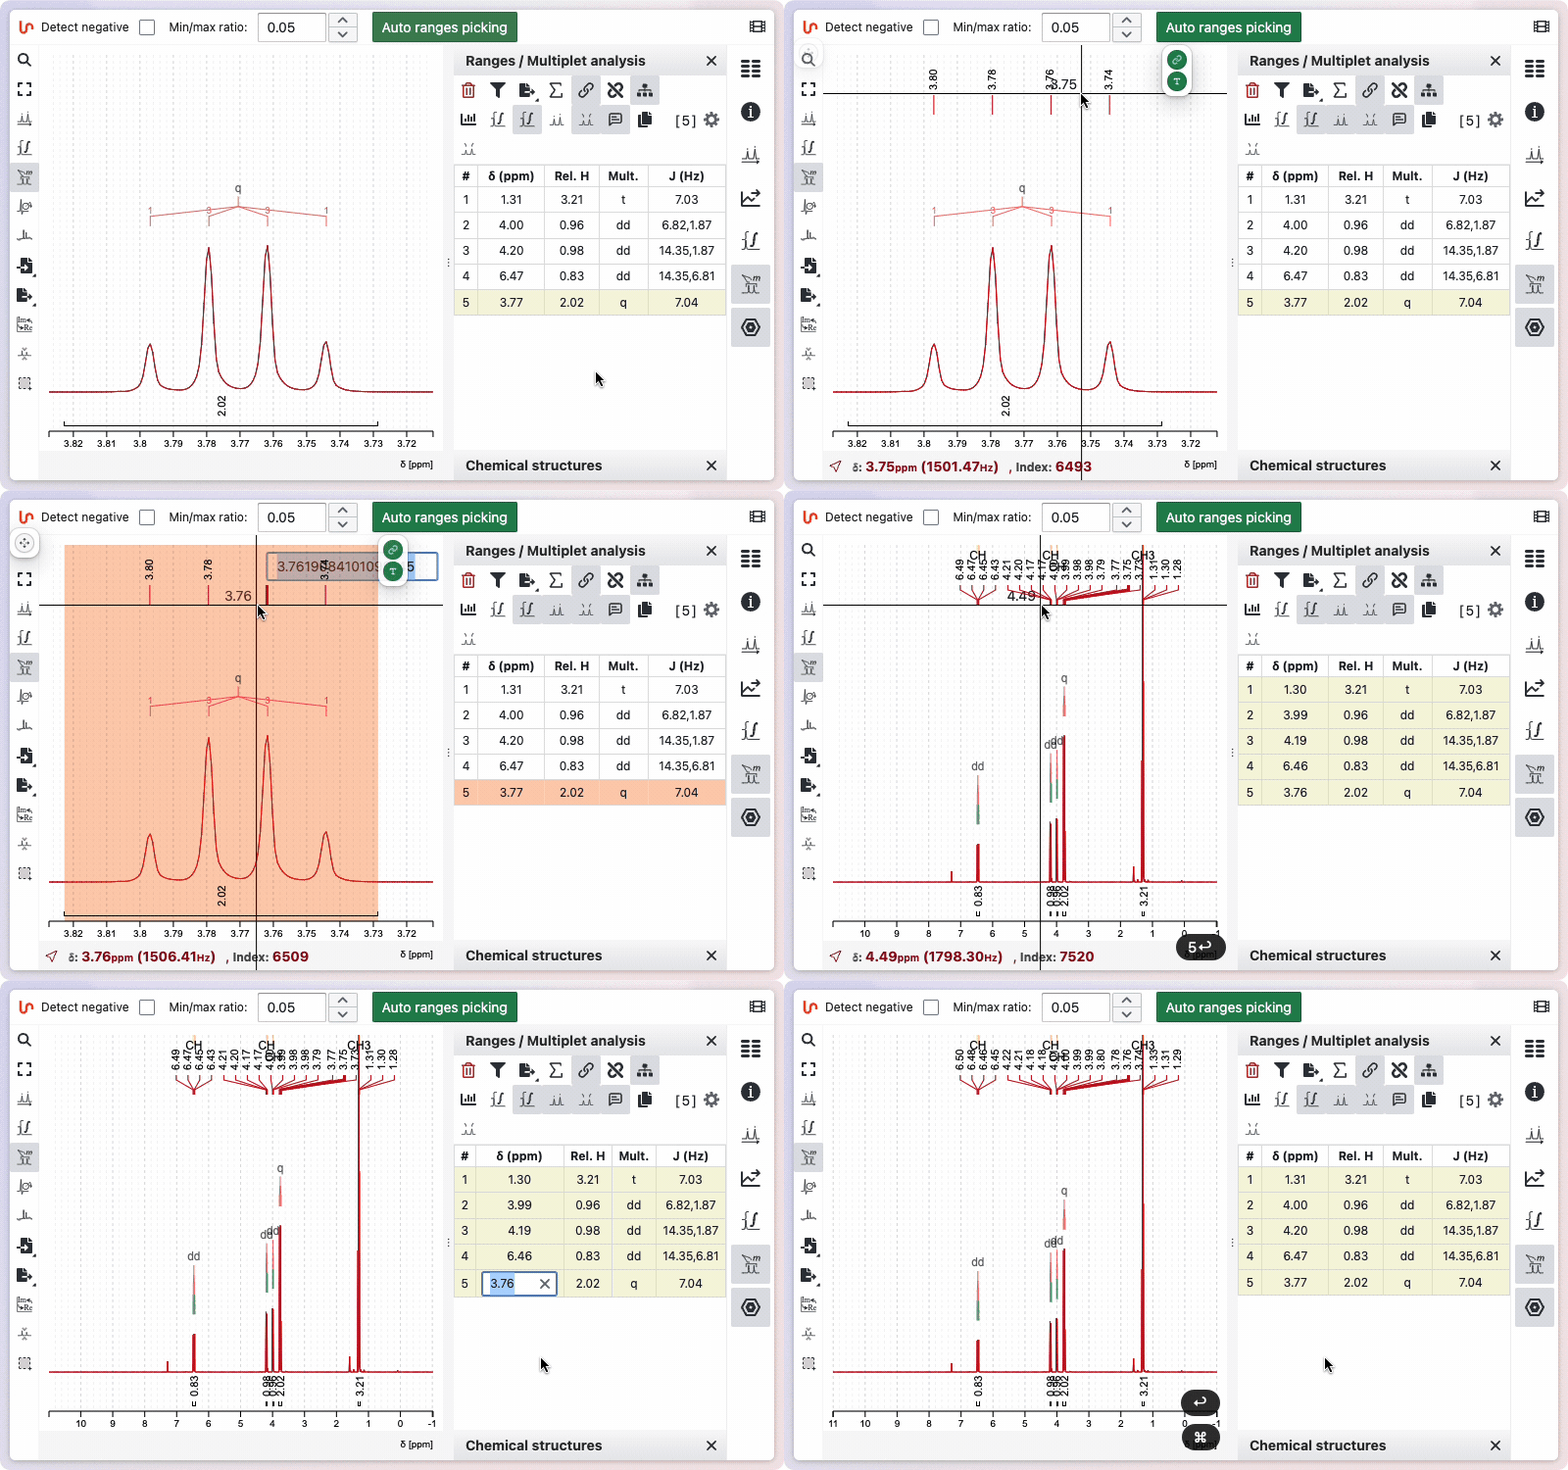
There are several ways to set the reference in NMRium:
- Using the range picking tool: Display the peaks, then double-click on a peak to assign a new reference value.
- Using the range panel: Double-click on the reference value in the panel to edit and set a new value.
Specify the sum of integrated protons
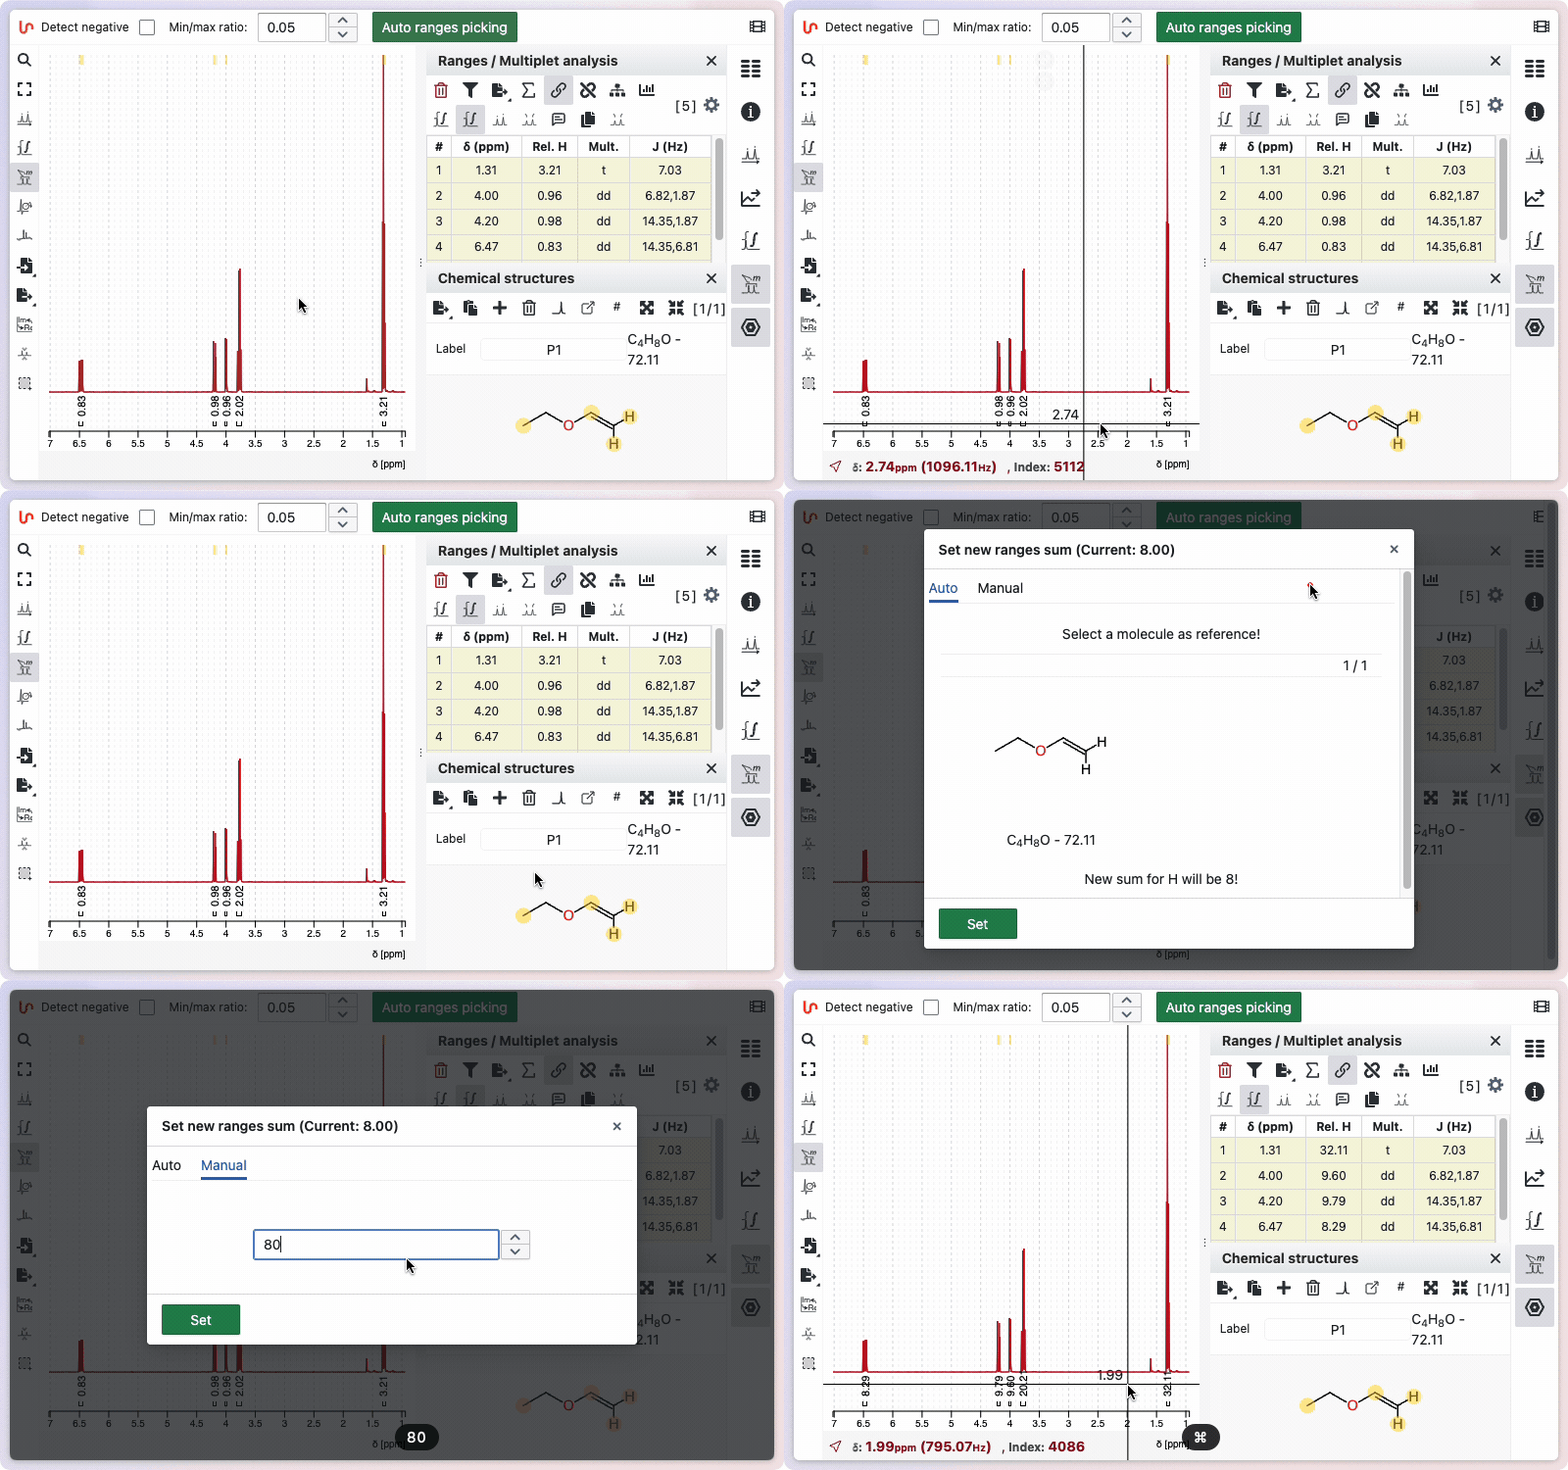
If a molfile exists, the default proton integration will correspond to the number of protons in the molecular formula. If no molecule is defined, the default sum is 100.
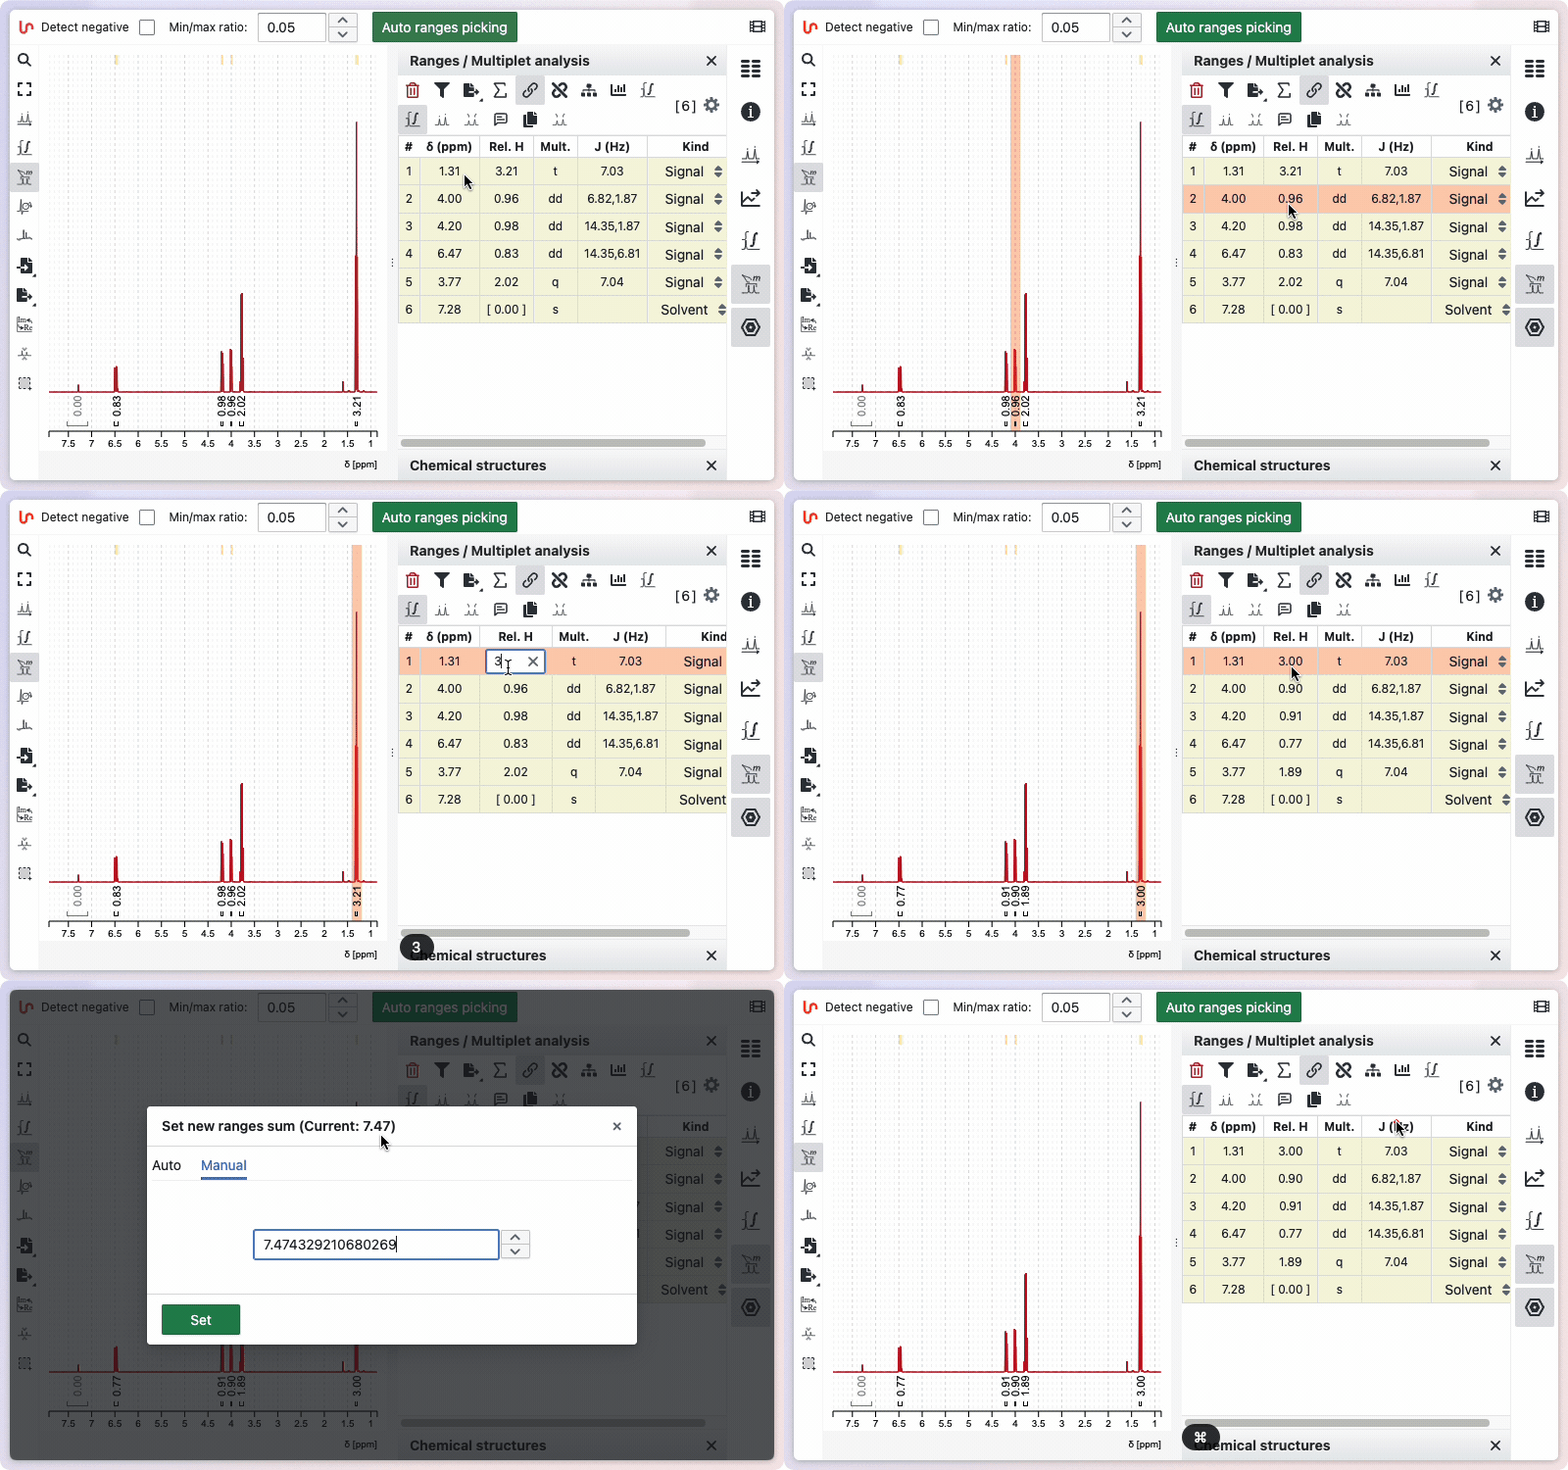
To change this sum manually, click on the sum symbol in the ranges panel. A window will open, giving you two options: enter the number of protons manually, or use the value from the sum formula. To enter the number manually, click the Manual button.
Type the desired number of protons in the corresponding field, then click Set to save. To use the number of protons from the sum formula, click the Auto button. The calculated value will be displayed; click Set to apply it.
To change the integration value for a specific range:
Open the ranges panel. Double-click on a relative integral to enter a new value. The total sum of protons will be updated accordingly.
Range kind
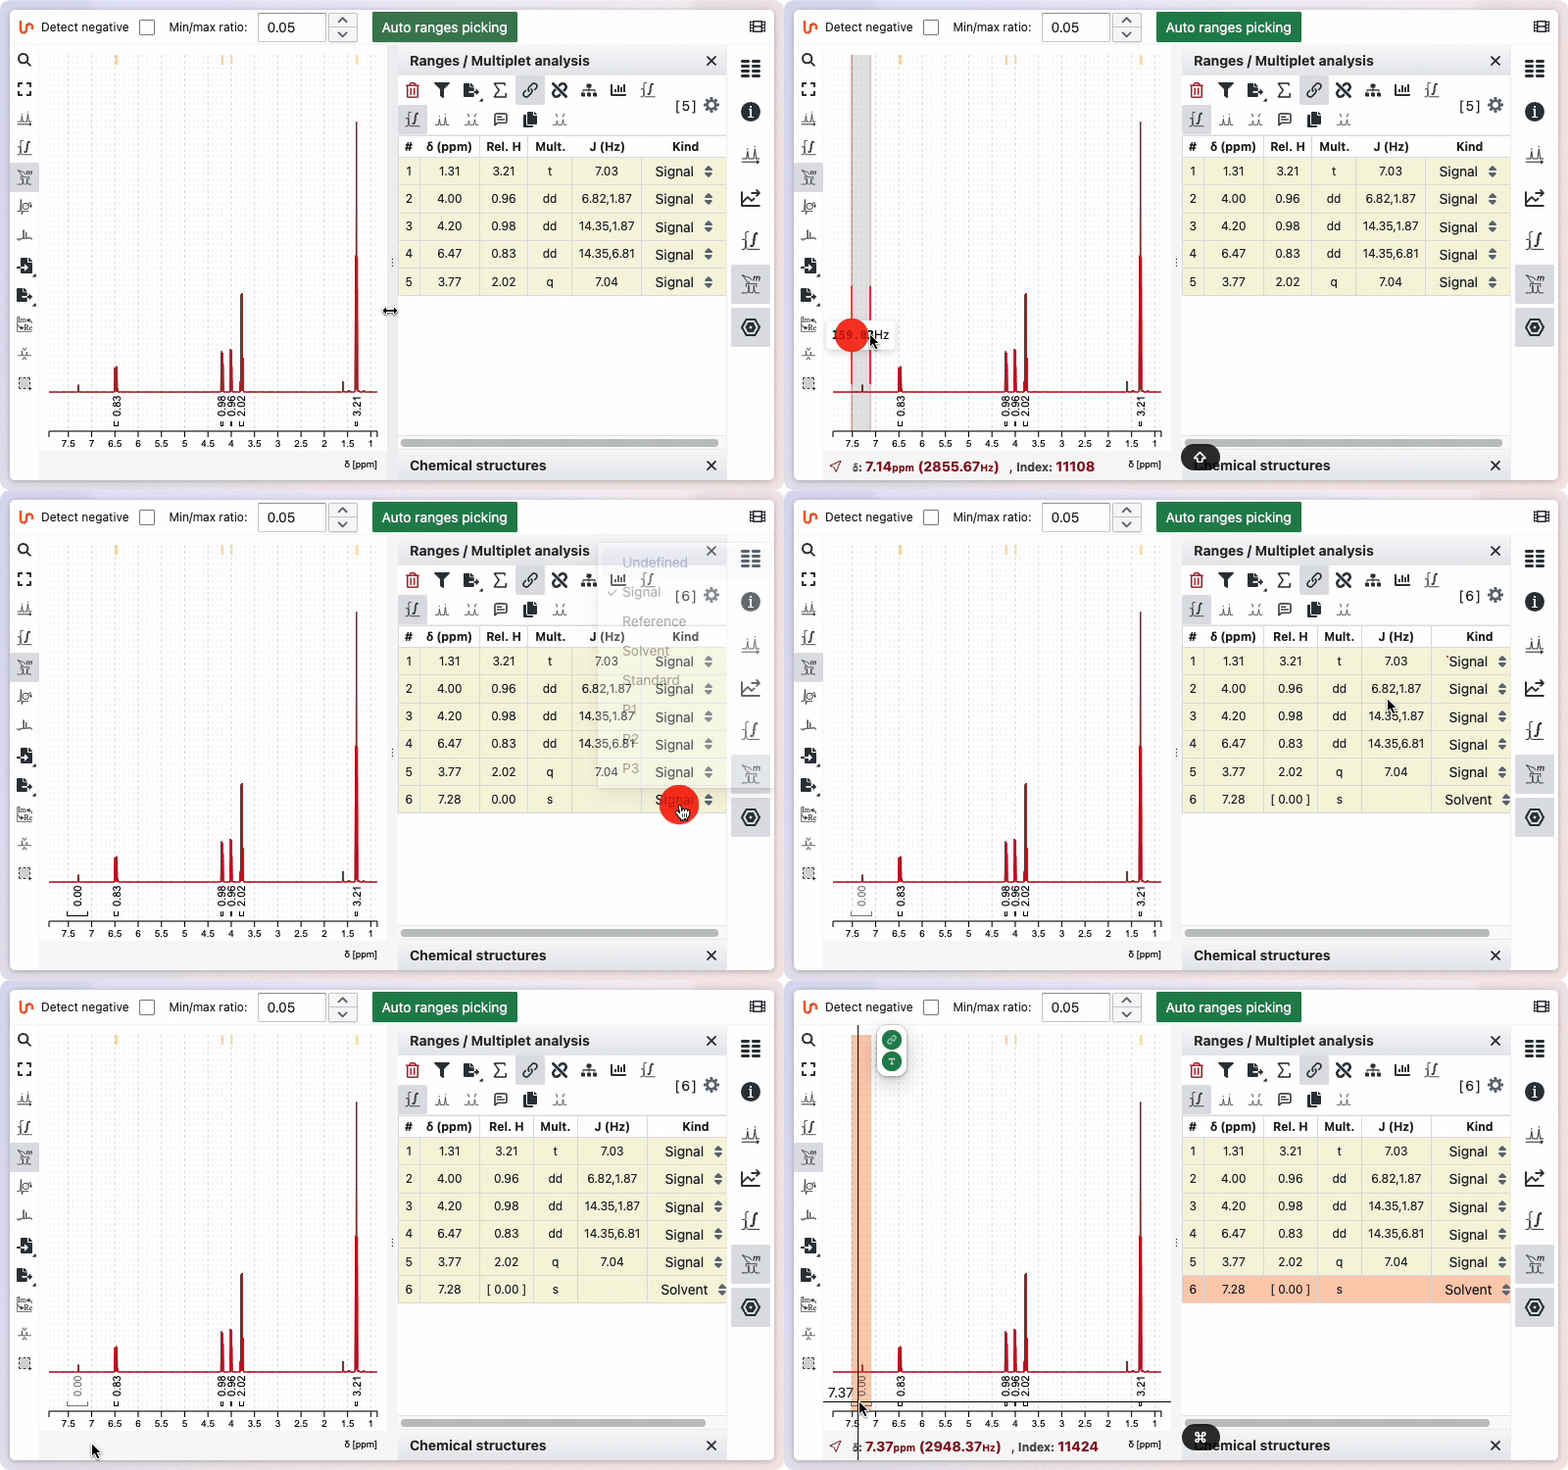
Sometimes your sample may contain impurities or residual solvent. If you integrate these signals, their values will be included in the total sum of protons, which can affect the relative integrals of other ranges. To avoid this, you can specify the kind for a particular range. When marked as impurity or residual solvent, the integral value will appear in square brackets and will not be included in the calculation of the total sum of integrals.
The toggles
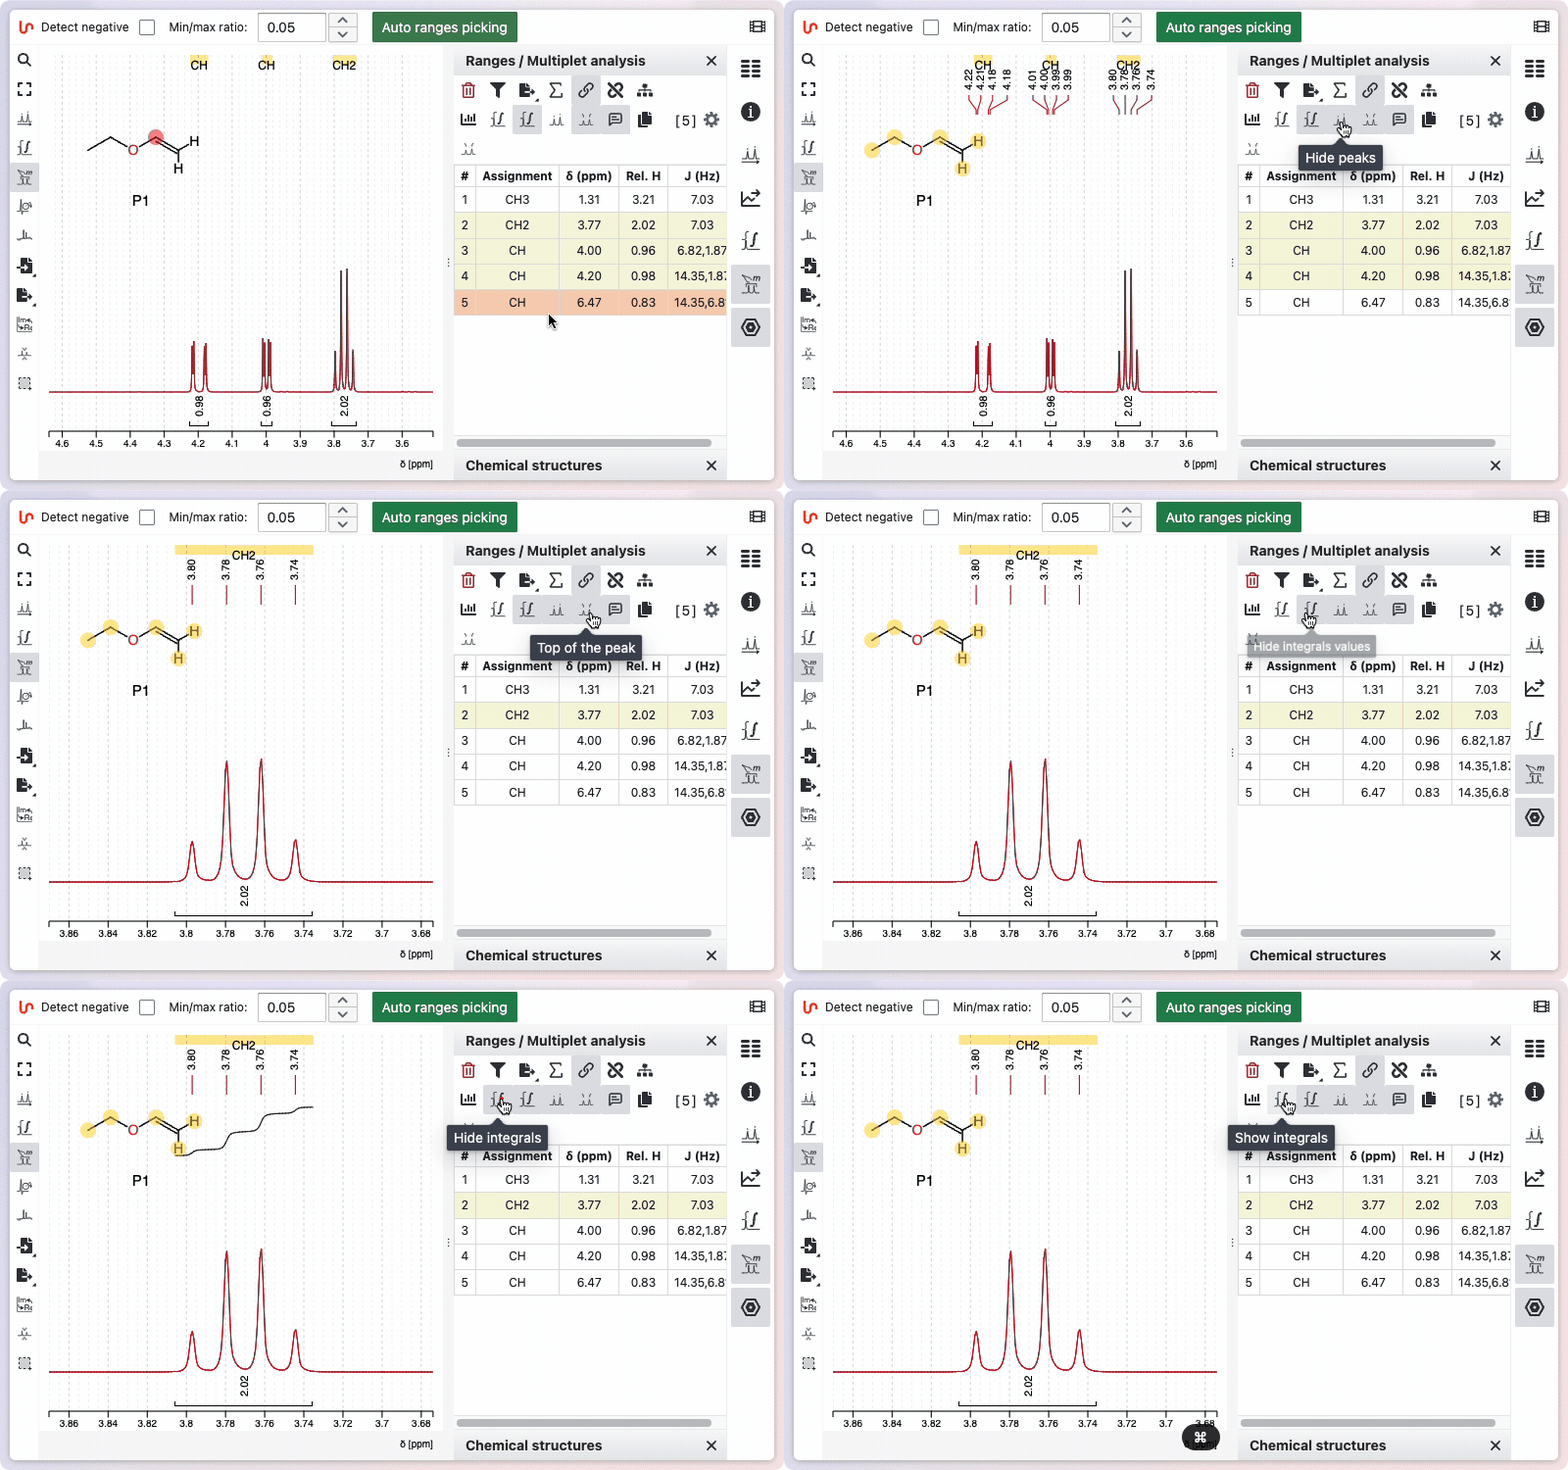
Various toggle buttons are available to display integrals, peaks, the multiplicity tree, and other features.
Multiplicity Tree
You can view the multiplicity trees of the signals. To use this function, click the "Show Multiplicity Tree in Spectrum" button. If you do not want the multiplicity tree to be displayed, click the button again.
J-Graph
J-Graphs provide a visual representation of the coupling network between protons in an NMR spectrum. Based on the work of Damien Jeanneret, the J Graph displays each coupling constant (J value) of a signal as a node. If two multiplets share the same coupling constant, a horizontal line links them. The tolerance for matching coupling constants is specified in the settings of the range panel and is set to 0.2 Hz by default.
To view the J Graph for your signals, click the "Show J Graph" button. The graph will appear above the spectrum, with nodes representing signals and lines representing the coupling constants. If you do not want the J Graph to be displayed, click the button again to hide it.
This visualization is especially useful for understanding the structure of spin systems and for assigning signals in crowded regions of the spectrum.
Show Integral
Two toggle buttons are available: one displays the integration as a line drawn on the spectrum, and the other shows the relative values below the spectrum.
You can view the integrals of the signals by clicking the "Show Integrals" button. Click the button again to hide the integrals if you do not want them displayed.
Displaying peaks
Two toggle buttons control how peak values are displayed: one shows the peak values at the top of the spectrum, while the other displays them directly above each peak. This allows you to choose the most convenient visualization for your analysis, making it easier to identify and compare peak positions.